 my cell phone never gets charged and random people in my contacts list get prank phone calls from "me".
Tuesday, January 27, 2009
This is Why...
my cell phone never gets charged and random people in my contacts list get prank phone calls from "me".Monday, January 19, 2009
Happy Birthday Linds!

Happy Birthday to my favorite sister, Lindsay. (Well I guess you are my only sister but even if I had another one you I'm sure you would still be my favorite.) I'm sorry your birthday is in January but I'm happy we are related and that you live on the same street as me and watch my kids all the time and make me laugh harder than anyone else.
You're the best.
Love, Kim
Warm Thoughts
 It has been really, really cold here lately but I'm trying to preoccupy myself with warm thoughts, this spinach dip , small sewing projects, Photoshop tutorials (I'm taking a class) and entertaining two very bored kiddos. How about you?
(P.S. I snagged the green/white, extra wide grosgrain ribbon at Pottery Barn of all places. Only $4 for 10 yards! There are some serious deals to be had this time of year. Perhaps the only redeemable thing about the month of January...)
Tuesday, January 13, 2009
My Best Friend's Wedding
 I finally got the pictures up from my friend's wedding in Philadelphia back in November. I have known Rachelle since grade school so it was really fun to be a part of her big day. I am also happy the pictures turned out especially considering the circumstances under which they were shot. To say it was FREEZING outside would be an understatement. Seriously, it was so, stinking, cold. Luckily, Rachelle and Jim were good sports and still managed beautiful smiles even though their teeth were chattering! (Come to think of it, maybe they were laughing just so they wouldn't cry. It was really that cold.) If you'd like to see more pictures, you can check them out here.
Calendar

 I still haven't purchased a 2009 wall calendar, which is very out of character for me. I have been given or purchased the Mary Engelbreit calendar every year since I was in 8th grade but I think I'd like something a little more grown up this year. Although it's a little pricey, I'm especially liking this one by Snow and Graham. It's just so pretty.
(If you still haven't purchased a calendar...you can find a compilation of aesthetically pleasing designs here and here.)
Thursday, January 8, 2009
Thrift Store Revival
This is technically another Urban Renewal post but I think the title "Thrift Store Revival" more accurately captures the essence of what I am doing- which is, reviving ugly, over-sized clothes from the thrift store. You know, bringing them back from the dead and turning them into fashionable/wearable attire.
This project took a few hours longer than my first dress because the fabric wasn't stretchy which made it harder to work with. Also, don't look too close because, as I've said before, I'm a pretty mediocre seamstress and there are several things I would do differently if I had to do it all over again. With that said, I'm still pretty pleased with the results and I'm thinking it is going to be really hard for me to pay more than $3 for a dress ever again.
 Before: A $3 navy blue polka dot polyester dress, complete with shoulder pads.
After: The same dress (sans the shoulder pads) with shorter puffed sleeves, a hem that hits just below the knee and a slightly lower neck line accented with a little tie. I topped it off with a pretty yellow flower belt I found on sale at J.Crew.


The Crafty Crow
So my friend Julie informed me that the party hats I made for Spencer's 1st birthday were featured on a blog called the Crafty Crow. (btw, thanks Julie!) I had actually never heard of the Crafty Crow before now but I checked it out and it looks pretty serious/legit. I also just checked my sitemeter and I'm getting a much higher level of traffic than I normally do so if you have arrived here from the Crafty Crow- welcome, welcome! I am flattered to have been mentioned on their site and welcome new visitors and comments with open arms.
Friday, January 2, 2009
Tutus
 Right before Christmas I took some fun pictures using a few new tutus I bought on e-bay. I was pleased with the way they turned out since I just shot them in my dining room with no special lighting or anything. Having an extremely cute niece as a model might have had something to do with it though! The one above is my absolute favorite but if you want to check out a few more click here.
A New Year, A New Quilt

One of my goals for the New Year is to make a throw quilt for Jared and I's bed. I purchased a variety pack of fabric squares pre-cut on e-bay (which is awesome because cutting the fabric is my least favorite part of quilting.) The squares are various prints from Amy Butler's Lotus collection. I'm planning to cut natural muslin squares to go in between so it should be pretty simple. What are some of your resolutions/goals for the New Year?
If You Can't Stand the Heat...
 I'd like to have this funny print framed and hanging in my kitchen. Find it here.
Tuesday, December 30, 2008
Gift Tags

I know that Christmas has already come and gone. However, in an effort to complete any unfinished business in 2008 I think I need to confess my undying love for these clever gift tags before I ring in the New Year. And as if the cute idea weren't enough, you can download a template to make your very own right here. (Isn't the internet awesome?!)
(From Inchmark, yet another lovely blog.)
Monday, December 29, 2008
Merry & Bright
 We had a very merry christmas and I hope you all did too! I think the highlight for me was the part of the day we spent roller skating with family. I LOVE roller skating but haven't been since college! Luckily my cool sister-in-laws rented the rink for everyone to enjoy. Here are some pictures of the fun...


Thursday, December 18, 2008
Urban Renewal How-To
Several people have asked me how I went about reviving the ugly thrift store dress. If you are interested in the boring sewing details, please read on. But note, I am in no way-not even close- to being a good sewer. I usually just sort of wing it so hopefully this makes sense. Also if the term "right sides together" makes you want to beat your head against a wall, this post might not be for you. I'm just saying.
1. Before I cut or sewed anything I had a good idea of what I wanted the dress to look like. I gleaned my inspiration from a couple of dresses I've had my eye on recently. (Found here and here.) Inspiration = A good thing.


1. Before I cut or sewed anything I had a good idea of what I wanted the dress to look like. I gleaned my inspiration from a couple of dresses I've had my eye on recently. (Found here and here.) Inspiration = A good thing.

(FYI: The ugly dress I bought was made of a soft, tight knit sweater material with a little bit of stretch. The stretch is important because without it I might have had to add a zipper or something crazy like that. So, if you are considering doing this, I suggest finding something with a little stretch. It is very forgiving to sewing novices like myself.)
2. I started by cutting the dress at the empire seam so the dress was in two pieces. I started working with the top piece first. To make it more fitted, I added just a little runching under the bust. To do this, I set my machine to the longest straight stitch setting and without back-stitching, I sewed along the bottom of the piece, just above the old empire seam. I believe the technical term for this is "baste stitch." I pulled the loose thread ends to gather the fabric until I achieved my desired amount of runching. (By the way, is runching a real word?)

3. The runching made the top a little more fitted but not quite enough. So next, while wearing the top piece inside out, I pinched the extra fabric at the side seams and down the sleeves and pinned it so I had a rough idea of how much I needed to take off. (I didn't take any pictures during the process but the picture below illustrates what I'm trying to say.) I recommend taking off less than you think and trying on the garment again. You can always take off more, but it's a pain to rip out seams to add more.

5. I wrapped piece #3 around my waist, pinned it in place, cut off the excess and sewed it to fit. I didn't want any puckering in the waist band, I wanted it to lay nice and flat so I made sure it was the same diameter as piece #1. Then, with right sides together I sewed the waist band(#3) to the top piece (#1).

And there you have it. A brand new dress! (sort of.) I hope someone finds this post useful because it took a really long time to write. I'm off to bed. Happy renewaling!

2. I started by cutting the dress at the empire seam so the dress was in two pieces. I started working with the top piece first. To make it more fitted, I added just a little runching under the bust. To do this, I set my machine to the longest straight stitch setting and without back-stitching, I sewed along the bottom of the piece, just above the old empire seam. I believe the technical term for this is "baste stitch." I pulled the loose thread ends to gather the fabric until I achieved my desired amount of runching. (By the way, is runching a real word?)

3. The runching made the top a little more fitted but not quite enough. So next, while wearing the top piece inside out, I pinched the extra fabric at the side seams and down the sleeves and pinned it so I had a rough idea of how much I needed to take off. (I didn't take any pictures during the process but the picture below illustrates what I'm trying to say.) I recommend taking off less than you think and trying on the garment again. You can always take off more, but it's a pain to rip out seams to add more.

4. Once the top was fitted, I decided to make the middle waist band. I made this by cuting off about six inches of fabric from the top of piece #2 in my lovely illustration which in turn made piece #3.


5. I wrapped piece #3 around my waist, pinned it in place, cut off the excess and sewed it to fit. I didn't want any puckering in the waist band, I wanted it to lay nice and flat so I made sure it was the same diameter as piece #1. Then, with right sides together I sewed the waist band(#3) to the top piece (#1).

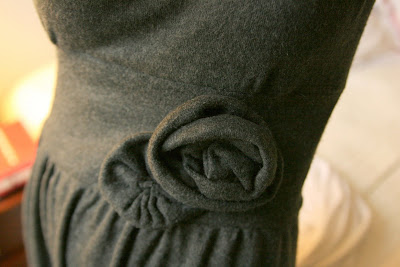
6. All I had left to do was attach the skirt (#2). I cut a few more inches off the top of piece #2 so the hem would fall just below my knee. I also wanted a fuller skirt so I did a little runching here too. Once again, I did a baste stitch around the top of the skirt piece and pulled the loose thread ends to pucker the fabric. Once it was runched to my liking and roughly the same diameter as the waist band, I sewed them right sides together (of course.) I only had a few inches of scrap fabric left over which I used to make some fabric flowers for the waist band. Here is a close up so you can see how the three pieces (top, waist band and skirt) are sewn together.


Tuesday, December 16, 2008
Urban Renewal
I recently read a really cool blog post about a girl who takes over-sized t-shirts and turns them into cute little outfits. (Her name is Mari Santos and she showcases her creations on a web-site called Urban Renewal, in case you are interested.) On a recent trip to the thrift store, I decided I wanted to try a little Urban Renewal of my own. I bought an an over-sized dress for $3.00 and spent about 1 1/2 hours making it into something worth wearing. I am thrilled with the results!

 This is soooo much easier and so much cheaper than trying to make a dress from scratch. I have two other thrift store dresses waiting in the wings and I can't wait to get my hands on some old t-shirts. This is going to be fun.

 This is soooo much easier and so much cheaper than trying to make a dress from scratch. I have two other thrift store dresses waiting in the wings and I can't wait to get my hands on some old t-shirts. This is going to be fun.
Welcome to Winter in Ohio
 Behold! The lovely view out my back door today. Unfortunately, this is as much sun as I've seen in about a week... or maybe more. Honestly I can't remember. Not cool. It's also something like 17 degrees outside. Yeah, really not cool. Kind of anticlimactic but I guess this post marks the official start to my "I Hate Winter Blog Tour" for 2009. Let the incessant whining begin!
(On a more positive note, I just finished a really fun sewing project that I'm going to blog about next!)
Monday, December 8, 2008
High Chair
I love taking pictures of Spencer in his high chair. 1-I have lots of good natural light in my kitchen/dining room, 2-He can't run away, 3- He's typically pretty happy (and cute) when he's eating. So, as far as photos go, it's a winning combination! Here are a few recent favorites:


 {Spencer 14 months}


 {Spencer 14 months}
Tuesday, December 2, 2008
Stuck Labels
 Oh how I love projects that involve pretty labels. If you are also a label-lover, check out this brand new company: Stuck Labels. The designs are simple but clever and the prices are affordable. The creative gal behind one of my favorite blogs, Oh Happy Day, is also the founder of the company. Check out her post on the company's launch with lots of other pretty pictures here.
Friday, November 28, 2008
Happy Thanksgiving
Jared and I had a happy Thanksgiving and so much to be thankful for. In past years, we have spent the day at the homes of other family members but this year we hosted Thanksgiving at our own home for the very first time. We enjoyed a nice, quiet day with the boys and Jared's parents. Aside from stuffing myself silly and then taking a nap afterward, my next favorite part of the day was setting a pretty table, complete with place cards and my grandmother's silver. I think Jared's favorite part was cooking and carving the turkey. All in all, I'd say a good time was had by everyone. Happy Thanksgiving!


Wednesday, November 26, 2008

Thursday, November 20, 2008
Later Gators
 I'm hopping on a plane to Philadelphia as we speak. One of my best friends from high school is getting married this weekend and I'm taking all the pictures! Hopefully I'll have some fun images to share when I get back. Have a good weekend everyone!
Subscribe to:
Posts (Atom)