1. Before I cut or sewed anything I had a good idea of what I wanted the dress to look like. I gleaned my inspiration from a couple of dresses I've had my eye on recently. (Found here and here.) Inspiration = A good thing.


(FYI: The ugly dress I bought was made of a soft, tight knit sweater material with a little bit of stretch. The stretch is important because without it I might have had to add a zipper or something crazy like that. So, if you are considering doing this, I suggest finding something with a little stretch. It is very forgiving to sewing novices like myself.)
2. I started by cutting the dress at the empire seam so the dress was in two pieces. I started working with the top piece first. To make it more fitted, I added just a little runching under the bust. To do this, I set my machine to the longest straight stitch setting and without back-stitching, I sewed along the bottom of the piece, just above the old empire seam. I believe the technical term for this is "baste stitch." I pulled the loose thread ends to gather the fabric until I achieved my desired amount of runching. (By the way, is runching a real word?)

3. The runching made the top a little more fitted but not quite enough. So next, while wearing the top piece inside out, I pinched the extra fabric at the side seams and down the sleeves and pinned it so I had a rough idea of how much I needed to take off. (I didn't take any pictures during the process but the picture below illustrates what I'm trying to say.) I recommend taking off less than you think and trying on the garment again. You can always take off more, but it's a pain to rip out seams to add more.

5. I wrapped piece #3 around my waist, pinned it in place, cut off the excess and sewed it to fit. I didn't want any puckering in the waist band, I wanted it to lay nice and flat so I made sure it was the same diameter as piece #1. Then, with right sides together I sewed the waist band(#3) to the top piece (#1).

And there you have it. A brand new dress! (sort of.) I hope someone finds this post useful because it took a really long time to write. I'm off to bed. Happy renewaling!

2. I started by cutting the dress at the empire seam so the dress was in two pieces. I started working with the top piece first. To make it more fitted, I added just a little runching under the bust. To do this, I set my machine to the longest straight stitch setting and without back-stitching, I sewed along the bottom of the piece, just above the old empire seam. I believe the technical term for this is "baste stitch." I pulled the loose thread ends to gather the fabric until I achieved my desired amount of runching. (By the way, is runching a real word?)

3. The runching made the top a little more fitted but not quite enough. So next, while wearing the top piece inside out, I pinched the extra fabric at the side seams and down the sleeves and pinned it so I had a rough idea of how much I needed to take off. (I didn't take any pictures during the process but the picture below illustrates what I'm trying to say.) I recommend taking off less than you think and trying on the garment again. You can always take off more, but it's a pain to rip out seams to add more.

4. Once the top was fitted, I decided to make the middle waist band. I made this by cuting off about six inches of fabric from the top of piece #2 in my lovely illustration which in turn made piece #3.


5. I wrapped piece #3 around my waist, pinned it in place, cut off the excess and sewed it to fit. I didn't want any puckering in the waist band, I wanted it to lay nice and flat so I made sure it was the same diameter as piece #1. Then, with right sides together I sewed the waist band(#3) to the top piece (#1).

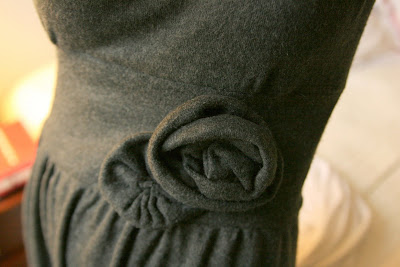
6. All I had left to do was attach the skirt (#2). I cut a few more inches off the top of piece #2 so the hem would fall just below my knee. I also wanted a fuller skirt so I did a little runching here too. Once again, I did a baste stitch around the top of the skirt piece and pulled the loose thread ends to pucker the fabric. Once it was runched to my liking and roughly the same diameter as the waist band, I sewed them right sides together (of course.) I only had a few inches of scrap fabric left over which I used to make some fabric flowers for the waist band. Here is a close up so you can see how the three pieces (top, waist band and skirt) are sewn together.


4 comments:
So very impressive. I have to share this on my blog, I have a friend who I think just might get use out of it. As you probably could have predicted, I skimmed it b/c sewing details are above me. Still, I had to get the basic idea. I am SO impressed!
Wow- super impressive! What a neat idea and such a great result. I think you can go ahead and call yourself a good sewer... maybe a nifty needler (too corny?)
great idea and a sweet tute! thank you.
Absolutely fabulous! Thanks for sharing. You've done a great job and it's so stylish and simple!!!
Post a Comment