(THE BASICS)
1. The shirt before I did anything.

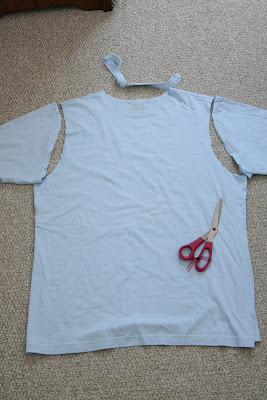
2. I almost always start by cutting off the sleeves and the ribbing around the neck. (Assuming the shirt you have chosen is a crewneck.)

4. Take off some of the length. Have an idea of how long you want the shirt to be before you cut. Remember to factor in a 1/2 inch seam allowance for heming.

5. Try the shirt on and pinch it how you want it to fit. Then, turn the shirt inside out and take in the sides. I wanted the shirt to have a bell or a-line shape so I sewed at a slight diagonal away from the arm pit.
(THE RUFFLE)

7. Here is the tube after I turned it right side out.

8. To make the ruffle, I did a loose under-over stitch through both layers of fabric down the entire length of the tube. (Be sure to tie a knot at the end of your thread. You don't want it to pull through.)

9. When you reach the end of the tube, pull the thread to pucker the fabric. (Don't pull too hard or you'll break the thread!) I call this ruching and it comes in handy quite often. You can pucker it as tight or as loose as you like. I puckered mine to fit almost around the collar of the shirt.

10. Pin the ruffle in place and sew it to the collar. I left about 3 inches on each end loose so I could sew a bow underneath.

(THE SLEEVES)

12. Measure and with the sleeve turned inside out, sew the sleeve to fit the arm hole. (Be sure to factor in a seam allowance here.)

13. Once the sleeve and the arm hole are the same size, place them right sides together and stitch.

14. When you turn it right side out the shirt will look like this:

15. Here I trimmed a little length off the sleeve. With the sleeve turned inside out, I folded it over and 1/4 inch, and ironed. I folded it over again, this time about 1/2 inch and ironed again.

16. With the sleeve still turned inside out I sewed along the edge of the fold almost all the way around the sleeve.

17. As you can see, I left a small opening at the under side of the sleeve.

18. Here I inserted a 1/4 inch piece of elastic through the opening and worked it through the casing.

19. It makes the sleeve look like this:

20. Sew the loose ends of elastic together and sew the opening (See step 17) shut. When you turn the shirt right side out it will look like this:

21. Pin some cute ribbon in place under the riffle collar. Sew it down and then sew the loose ends of the collar down on top of the ribbon.

22. Final Result
 That's it! Hopefully someone out there finds this post useful. If you have any questions e-mail me or leave a comment and I'll try my best to help. Good luck and happy reviving!

I just scanned this but I am in LOVE! SO CUTE KIM!! I am going to try to re-create and hopefully soon I will show you my Re-do! GREAT JOB and thanks for the great write up and pics along with it! YEAH!
ReplyDeleteYou are SO talented! Another adorable creation. I love seeing them. We miss you at card club!
ReplyDeleteC-u-t-e!!!!!
ReplyDeletethank you for showing us all your work. you make it look so easy!
ReplyDeleteGreat tute, Kim. It really opened the door for me to come up with some neat creations!
ReplyDeleteWell done!
girlfriend, you are blowing my mind with your step-by-step. very well detailed. great job. the top is really cute. i wanna be like you when i grow up.
ReplyDeleteThank you! I am so excited to try it!
ReplyDeletewow. wow. wow.
ReplyDeleteVery cute! I will be heading to the thrift store shortly to look for some old tees!
ReplyDeleteThis is super pretty! i love it!
ReplyDelete